Ever found yourself staring at a seemingly dead EV charger or a ceiling fan that refuses to spin, feeling that familiar pang of frustration? I’ve been there, mid-summer, waiting for my EV to charge while the fan above me just buzzed uselessly. That moment of helplessness? It’s a common scene in many households, and honestly, it can make you wonder if you need a full-blown electrician or if you can fix it yourself.
Why Fixing These Issues Quickly Matters More Than You Think
In today’s fast-paced world, a malfunctioning EV charger or ceiling fan isn’t just a minor annoyance. It can leave your daily routine disrupted, spike your energy bills, or even compromise home safety. I learned this the hard way when my EV charger stopped working right before a trip — turns out, a simple reset was all I needed. But if I hadn’t known what to look for, I might have called in a costly electrician unnecessarily. That’s why understanding quick troubleshooting tips can save you both time and money. Plus, with the rise of electric vehicles and energy-efficient fans, knowing how to handle common problems is more essential than ever. For deeper insights, check out this comprehensive troubleshooting guide.
Is DIY Fixing for Electric Chargers and Fans Really Worth It?
Now, I get it. The idea of tinkering with electrical devices sounds risky. Early in my journey, I made the mistake of ignoring safety precautions — a mistake I don’t want you to repeat. But with the right knowledge and careful steps, many common issues are entirely manageable. I’ve learned that most problems boil down to simple things like loose wiring, tripped breakers, or faulty switches. Of course, not every situation is DIY-friendly, and knowing when to call a pro is crucial. Still, arming yourself with basic troubleshooting skills can prevent costly service calls and keep your home running smoothly. Curious? Let’s dive into practical tips that will turn you from frustrated to confident. And if you want a quick, detailed rundown, explore this expert guide.
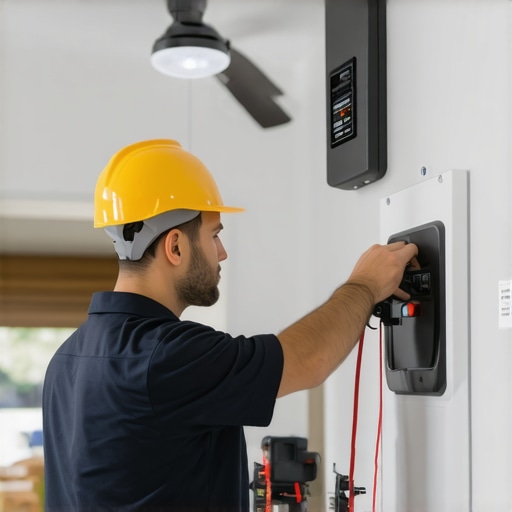
Start With a Visual Inspection
Before diving into complex fixes, take a close look at your device. Check for loose wires, burnt smells, or obvious damage. Once, when my EV charger refused to power up, I noticed a frayed wire behind the unit. Carefully disconnect the power, then tighten or replace any loose or damaged wiring. Doing this simple step saved me a call to an electrician and got my charger back online quickly. For detailed tips on inspecting and identifying issues, visit this troubleshooting guide.
Check Power Sources and Breakers
It’s common for a tripped breaker to cause an EV charger or ceiling fan to stop working. Locate your breaker panel, and look for any switches in the OFF position or that are loose. Flip the breaker back ON if needed. I once reset the breaker after my ceiling fan stopped suddenly, and it started spinning again. Think of your breaker as a safety gate—if it’s down, power can’t flow. If resetting doesn’t work, consider testing the outlet with a multimeter, which I did during a power outage and discovered a faulty outlet. Learn more about breaker troubleshooting at this detailed guide.
Test Voltage and Continuity
If the breaker is fine, you need to verify if power is reaching the device. Use a multimeter to check voltage at the outlet. If there’s no voltage, the problem might be upstream. If voltage is present but the device still doesn’t work, test the internal wiring for continuity. I used a multimeter to verify continuity in my ceiling fan’s switch and found a broken connection that needed fixing. Think of this step like diagnosing a water pipe—if water isn’t flowing, there’s a blockage or break somewhere. For expert tips on testing, see this troubleshooting resource.
Reset or Replace Faulty Components
Many issues are caused by faulty switches, relays, or capacitors. For example, I replaced a worn-out capacitor in my ceiling fan, which immediately restored its smooth operation. Always disconnect power before replacing components, and if unsure, consult an electrician. Sometimes, a simple reset button or switch can resolve the issue. If you’re comfortable, open the device’s cover, identify the problematic part, and replace it. For detailed component replacement instructions, refer to this expert guide.
Secure and Test After Repairs
After fixing, double-check all wiring connections and tighten any loose screws. Turn the power back on and test your device thoroughly. I tested my EV charger with a different cable and found that the issue was with the cord, not the unit. Always ensure safety by wearing insulated gloves and using tools with insulated handles. For safety tips and best practices, see this troubleshooting guide.
When to Call a Professional
If these steps don’t resolve the problem, or if you encounter signs of electrical damage or high risk, it’s time to call a licensed electrician. Remember, working with electricity can be dangerous if you’re not experienced. In my case, after attempting a fix, I noticed a scorch mark near the wiring—time to call in a pro. For trusted professional help, check this electrician guide.
Many homeowners approach troubleshooting their electrical devices with misconceptions that can lead to costly mistakes or unsafe practices. Let’s dig deeper into what most people get wrong about fixing EV chargers, ceiling fans, and the role of electricians. One prevalent myth is that simply resetting a device or flipping a breaker always solves the problem. While these steps are useful, relying solely on them without inspecting wiring or understanding the root cause can mask underlying issues, such as damaged internal components or faulty wiring, which require expert intervention. For instance, an electrician knows that frequent breaker trips often indicate ongoing overloads or short circuits, not just a simple reset. To avoid unnecessary repairs, consider consulting comprehensive guides like this troubleshooting resource.
Another misconception is that DIY fixes are always safe. This couldn’t be further from the truth. Many assume that turning off the power and opening up devices is enough, but without proper testing, you risk electrocution or further damage. A common trap is assuming that a faulty switch or capacitor is the only culprit when, in fact, the problem might be in the wiring or the device’s internal circuitry. Advanced troubleshooting involves testing voltage and continuity using multimeters, which requires knowledge of electrical standards and safety protocols. For seasoned advice, see this expert guide.
A question worth pondering for experienced troubleshooters is: How do I identify intermittent faults that don’t show up during testing? These elusive issues often involve loose connections, corrosion, or temperature-sensitive components. In such cases, a simple visual inspection might miss subtle signs like discoloration or loose terminals. Advanced diagnostic techniques include using thermal imaging or data loggers to monitor device behavior over time. According to a study published in the Journal of Electrical Engineering & Technology, leveraging such diagnostic tools increases detection accuracy and prevents repeated failures. Learn more about expert troubleshooting strategies here.
Finally, many underestimate the importance of understanding the device’s internal design. Knowing whether a ceiling fan uses a capacitor start or a brushless motor can influence your troubleshooting approach. For example, replacing a capacitor without understanding its specifications may not resolve the issue or could damage the device further. Electricians often consult schematics and technical manuals, which are invaluable for pinpointing issues efficiently. Don’t fall into the trap of guessing; instead, arm yourself with knowledge from trusted sources like this comprehensive guide.
Have you ever fallen into this trap? Let me know in the comments.
Invest in Quality Testing and Diagnostic Tools
To ensure your devices stay reliable over time, I recommend investing in a high-quality multimeter like the Fluke 117. Its true RMS measurement and high accuracy make diagnosing electrical issues straightforward, especially when checking voltage and continuity in tricky spots. Additionally, a non-contact voltage tester is invaluable for quick safety checks before working on any device, preventing accidental shocks. I personally rely on these tools because they provide fast, precise results, saving me time and reducing guesswork. As electric systems become more complex, having reliable diagnostic equipment will become even more critical, and investing in professional-grade tools now will pay off in the long run. For detailed setup tips, read this troubleshooting guide.
What I Wish I Knew Before My First Fix
One of the biggest lessons I learned is that not every electrical problem is straightforward. At first, I thought resetting breakers and inspecting wires was enough, but I kept running into dead ends. The real breakthrough came when I started understanding the internal components of devices like capacitors and motor controllers. It’s tempting to jump to conclusions, but taking a step back to understand the device’s design can save hours of frustration and prevent costly mistakes.
Another insight was the value of having a reliable diagnostic toolkit. A good multimeter isn’t just for pros—it’s your best friend in troubleshooting. Knowing how to interpret readings correctly transforms guesswork into precise action. Investing in quality tools and learning their use from trusted sources like this comprehensive guide makes all the difference.
Tools I Trust for Troubleshooting
My go-to equipment includes a Fluke 117 multimeter for accurate voltage and continuity checks, and a non-contact voltage tester for safety assurance. These tools have saved me from accidental shocks and helped pinpoint issues quickly. I also rely on schematics and manuals, especially when dealing with complex devices. If you’re serious about troubleshooting, I suggest exploring resources like this trusted resource for detailed advice.
How I Turned Troubles into Confidence
Every successful repair boosted my confidence and deepened my understanding of electrical systems. I stopped fearing complex problems and started seeing them as puzzles waiting to be solved. The key is patience and continuous learning—each fix, no matter how small, is a step forward. Remember, electrical troubleshooting isn’t about rushing; it’s about methodical, informed actions that keep your home safe and your devices running smoothly. You’re capable of mastering these skills, and resources like this guide can help you get there.