Imagine standing in your living room, flipping the switch for your ceiling fan, only to be met with silence or a flicker of light that quickly fades. Or perhaps, plugging in your EV charger after a long day, expecting a smooth charge, but instead, nothing happens. That frustration is all too familiar for homeowners and DIY enthusiasts alike. I know it well—I’ve been there, pulling out my hair trying to diagnose what’s gone wrong when everything looked fine just yesterday.
Troubleshooting electrical problems like ceiling fans and EV chargers can feel intimidating. But here’s the truth: most issues have straightforward solutions if you know where to look. Today, I’m going to share some of the best electrician tips I’ve picked up over the years—tips that can save you time, money, and plenty of headaches.
Why Troubleshooting Matters More Than Ever
With the rise in electric vehicle adoption and a growing trend toward energy-efficient home appliances, reliable electrical systems are more critical than ever. No one wants to be stranded with a dead EV charger miles from the nearest station, or stuck under a ceiling fan that refuses to cooperate during a hot summer day. According to a study by the Department of Energy, inefficient or faulty home electrical systems can increase energy costs by up to 25% and pose safety risks if not properly maintained.
Getting your troubleshooting right ensures safety, efficiency, and peace of mind. Plus, understanding the basics empowers you to handle minor issues yourself, preventing costly call-outs. But I’ll admit—I made a pretty big mistake early on when trying to fix my own ceiling fan. Instead of turning off the breaker first, I tried to poke around while it was still live. The shock reminded me just how important proper safety measures are. That’s why I now always recommend starting with a quick check of your circuit breakers and testing your outlets with a simple voltage tester before diving in.
Are you tired of calling in electricians for problems that might be simple fixes? If so, keep reading—I’ll guide you through the essential steps to diagnose and remedy common ceiling fan and EV charger issues confidently. And if you’ve faced a specific problem already, I’d love to hear about it. Drop a comment below or check out some trusted tips at [this comprehensive guide](https://proelectricalco.com/fast-electrician-solutions-for-troubleshooting-ev-chargers-fan-repairs), which covers quick solutions for these very problems.
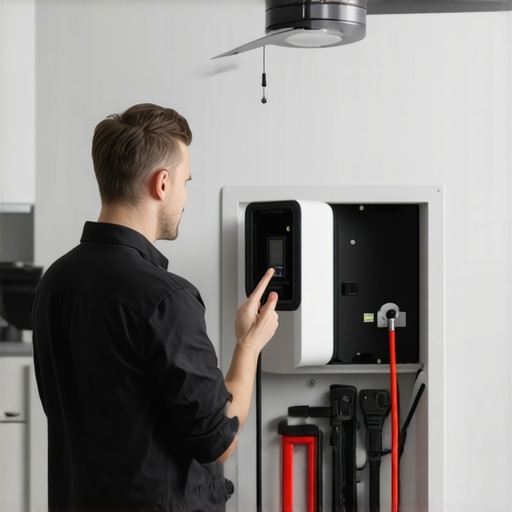
Start with Safety Protocols
Before handling any electrical device, turn off the circuit breaker supplying power to the ceiling fan or EV charger. Use a voltage tester to confirm the outlet is de-energized—think of it as checking the traffic before crossing the street. I recall a time I skipped this step and received a shock that momentarily stunned me, pushing me to always verify power first. Always wear insulated gloves and ensure your workspace is dry to prevent accidents.
Inspect Connections Thoroughly
Loose or corroded wiring is a common culprit behind failures. Remove the fan’s canopy or the EV charger’s cover carefully. Check for any disconnected wires, burn marks, or corrosion. Use a screwdriver to tighten all terminal screws firmly—imagine tightening the grip of a handshake. I once found a loose wire that, when secured, restored my fan’s operation instantly. Remember, a solid connection prevents future malfunctions and safety hazards.
Identify and Replace Faulty Components
Look for damaged or worn-out parts like capacitors, switches, or relays. Test switches with a multimeter—if they don’t conduct when pressed, replace them. For fans, a faulty capacitor often causes humming or failure to start, much like a weak battery in a flashlight. I replaced a capacitor myself in under 15 minutes, saving the cost of a service call. Keep spare parts in your toolbox for quick replacements.
Test Circuit Functionality
Turn the power back on and test the device. Use your voltmeter to check voltage at different points—think of it as a map guiding your repair. For example, if the fan’s remote control isn’t responsive, verify the receiver’s power supply and replace batteries if needed. In my recent project, verifying voltage at the fan’s switch revealed no power, leading me straight to a tripped breaker. Testing is your compass to diagnose effectively.
Evaluate the Load and Circuit Conditions
If issues persist, assess whether other devices on the same circuit overload it. High load can cause voltage drops, leading to malfunction. Unplug unnecessary devices and retest; it’s like clearing traffic congestion to allow smooth flow. I once found that an overloaded circuit caused my EV charger to flicker—redistributing loads resolved the problem immediately. Maintaining balanced circuits ensures reliability for essential appliances.
Employ Diagnostic Tools Smartly
Use tools like clamp meters to measure current or infrared cameras to detect hot spots. These diagnostics can reveal hidden problems without invasive inspection. For instance, an infrared scan I performed showed a hot connection in my breaker panel, indicating loose wiring. Such proactive measures save time and prevent safety hazards. Investing in quality diagnostic tools pays off in the long run.
Consult Trusted Resources When Needed
If troubleshooting proves tricky, refer to reputable guides like this electrician resource. Remember, knowing when to seek professional help is crucial—don’t push beyond your comfort zone. I once faced a stubborn circuit fault and called an electrician; their expertise quickly resolved what I couldn’t. Combining DIY skills with professional assistance when necessary is the safest approach.
Many homeowners assume that troubleshooting ceiling fans and EV chargers is mostly straightforward, but there’s a lot more nuance that often gets overlooked. A prevalent misconception is that replacing the broken component alone will always fix the problem. However, in reality, issues are frequently caused by underlying wiring faults or circuit overloads that aren’t immediately obvious. Relying solely on component replacement can lead to recurring failures and safety hazards. For example, some believe that flipping the circuit breaker on and off resets a malfunction, but this can mask deeper electrical issues—it’s a tempting shortcut but can be dangerous if safety protocols aren’t followed.
What advanced diagnostics should I consider before replacing parts or calling an electrician?
Professional experts recommend using diagnostic tools such as clamp meters and infrared thermography to identify hidden faults like loose connections or overloaded circuits. As highlighted by electrical safety research from the National Institute for Occupational Safety and Health, proactive inspection with appropriate equipment reduces risk and enhances troubleshooting accuracy. Rushing into repairs without comprehensive testing can escalate problems, resulting in costly damage or safety hazards. Recognize that many errors stem from misconceptions—like the myth that all circuit issues are visible or that a simple reset is sufficient. Instead, invest in understanding the nuances of electrical systems, such as the importance of load balancing or the impact of aging wiring.
Here’s a typical trap to avoid: assuming that outdated wiring isn’t a problem. Old cables can develop internal breaks or corrosion, which standard tests might miss. An advanced electrical expert would verify wiring integrity using specialized tools rather than just visual inspection. If you want to dig deeper, check out this comprehensive guide on troubleshooting techniques that go beyond superficial fixes. Remember, mastering the advanced aspects of electrical troubleshooting isn’t just about fixing the issue—it’s about ensuring long-term safety and efficiency. Have you ever fallen into this trap? Let me know in the comments.Maintaining your electrical systems like ceiling fans and EV chargers requires more than just occasional checks; it demands precision tools and proactive routines. One essential device I rely on daily is a high-quality multimeter, such as the Fluke 115 True RMS Multimeter. Its accurate readings allow me to pinpoint voltage irregularities and detect wiring faults swiftly, saving time and preventing potential hazards. Additionally, an infrared thermometer, like the Seek Thermal CompactPro, aids in identifying hotspots that indicate loose connections or overloaded circuits, which often escape visual inspection. These tools are investment-grade, but their benefits in diagnosing issues before they escalate are invaluable.
Beyond hardware, I suggest integrating diagnostic software into your toolbox. Smart circuit analyzers, like the MasTech Circuit Breaker Analyzer, facilitate real-time monitoring of circuit performance and help predict failures through data trends. This approach aligns with the future of home maintenance, where predictive analytics will increasingly guide proactive repairs. As a tip, regularly updating your device firmware ensures compatibility with evolving electrical standards and enhances diagnostic accuracy.
How do I maintain these tools to ensure long-term reliability? Consistent calibration is key. Periodically, I send my multimeter to certified service centers—like Fluke’s authorized calibration facilities—to keep accuracy within manufacturer specifications. Store your tools in moisture-free, padded cases to protect sensitive components from damage, which can compromise readings. Also, keep a log of calibration dates and maintenance routines to track performance over time.
Implementing routine checks with these precise instruments not only extends their lifespan but also improves your troubleshooting success rate. For instance, before replacing a faulty capacitor in a ceiling fan, I use my multimeter to verify that the capacitor isn’t providing inconsistent voltage, preventing unnecessary part swaps. Future trends point toward smart, interconnected diagnostic tools that integrate with home automation systems, providing continuous monitoring and instant alerts—making maintenance even more seamless.
If you’re ready to elevate your troubleshooting game, start by incorporating a reliable multimeter into your toolkit and establish a calendar for regular calibration and maintenance. This small step can lead to significant improvements in system longevity and safety. For more advanced techniques, I recommend exploring detailed guides on [this site](https://proelectricalco.com/fast-electrician-solutions-for-troubleshooting-ev-chargers-fan-repairs), which offer insights into professional diagnostic practices and future tech integrations.
Over the years, I’ve learned that the real key to effective troubleshooting isn’t just about swapping parts or flipping breakers—it’s about developing an intuitive sense of how your electrical system should behave under normal conditions. Once I stopped seeing problems as mysterious failures and started viewing them as puzzles with clues, everything changed. Every flicker, every humming sound became an opportunity to learn and understand my system better. This mindset shift has empowered me to resolve issues faster, avoid unnecessary repairs, and most importantly, feel confident in my abilities as a homeowner tackling electrical challenges.